
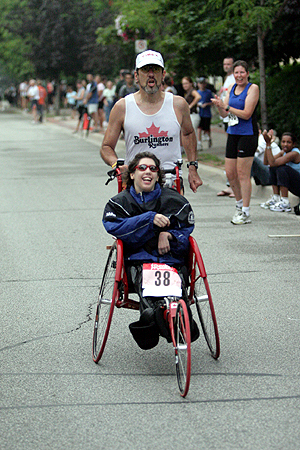
 Powering into the finish at the Burlington Ontario, Downtown Dash 10km, July 2006.
Amanda is laughing and waving because she can hear the race directory Kelly Arnott from VRPro Races announcing the names of finishers. She likes Kelly.
Amanda and I used a Special Needs III from Baby Jogger for six years, purchased in 2000 by our running club, the Burlington Runners. Baby Jogger has revamped the chairs over the years since we purchased ours and you can check their web site to see their current models. It wasn’t cheap, but at about $900.00 US (last time I checked) it’s still the most inexpensive alternative that I have found. I can vouch for the quality of their product. We logged over 3000 miles in six years of training and racing in our old jogger before Amanda finally outgrew it.
After the 2005 Boston Marathon, I decided that we had to get a new chair for Amanda. She has rods in her back to keep her upper body from twisting and she didn’t have enough support with the sling seat in the Baby Jogger for the longer training runs and races. It was also starting to get a little tight through the shoulders for her and I really wanted to cut down on the wind profile when racing on windy days (imagine pushing a sail).
In May 2005 I started looking for a replacement. I searched all over North America for a manufacturer. I tried contacting both Quickie and Invacare with no success. However, all the Internet contacts I made and any wheelchair racing clubs I spoke with pointed me to Eagle Sports Chairs as someone that could build a custom chair. After spending a lot of time looking, I don’t think there is another manufacturer in North America that is willing to do this type of work.
We retired the Baby Jogger in December 2005 and will be donating it to a local school with a very active special needs class. We are now training and racing in a custom built racer from Eagle Sports Chairs. While it did take us a while to get all the details worked out and the chair built, I have been very happy with the new racing chair. If you want more information on this, let me know and I’ll give you the details. We ended up working very closely with Eagle Sports Chairs, Amanda’s Occupational Therapist and the local seating clinic to make sure that the new chair could properly support her trunk and make her as comfortable as possible. The custom build race chair cost approximately $2500.00 US ($3000 Canadian) and the custom seat insert was $750.00 Canadian.
I had done quite a bit of research on what we needed through personal experience and study of push rim racers and their design. In the end I found that we required a number of features:
- The push handles and wheels had to be removable for shipping and transport.
- The push handles also had to be approximately 18 inches from the back axle (foot clearance) and 42 inches off the ground (my elbow height), for the best pushing ergonomics.
- The seating cockpit had to conform to very specific dimensions and angles to properly support Amanda and allow for the seating system being built locally to be mounted and allow for ease of removal for transport and storage.
- A frame attached seat belt for Amanda’s safety.
- A braking system of some kind. As it turned out, we had to custom design a better brake system.
- A non-steer-able, locked position, front wheel. The race buggy must track in a straight line with minimal intervention.
Since receiving the Eagle racer, we have had to make a few modifications to the shipped system. A number of these changes were made because of the different way that this racer is used compared to the push rim model that was the base design:
- Custom build seating insert to support Amanda’s hips and back.
- Foot sling to support Amanda’s feet and cushion her ankles from banging against the chair frame.
- The front tire brake was removed and replaced with a drag bar brake that rubs against the tire. The caliper brake on the front didn’t have enough weight on it to work, the tire just locked up and skidded along with no stopping power.
- Mountain bike bar ends and road bike handlebar tape were added on the push handles for added control and comfort.
- We moved the wireless speedometer from the front tire and frame, to the back tire and the push handle. The original location was designed for a push rim athlete. This allowed me to see the read out for distance and speed.
- A bike bell was added, to alert runners and other people that we share the road/trails with.
- Water bottle holders were added to the push bar uprights, to hold two water bottles.
- A fanny pack type bag slung between the seat uprights to hold keys, gels, energy bars, tools and repair kit.
- Foam padding at the top and sides of the wheel fenders to keep Amanda from bruising her elbows.
The two pushers (Team Hoyt and Team Hagkull) I have had the pleasure of talking with use bicycle type aero bars to push against, but I do not. I found that not swinging my arms to be too restrictive. I generally run the flats with one hand on the buggy push bar and the other swinging normally, switching up hands every five strides or so. This “style” wasn’t planned, it’s just the way I run with the racer. You will have to figure out through trial and error out what works best for you.
Follow the link below to see detailed pictures of Amanda’s racer, brake system, custom seating insert and foot support.
Detailed Pictures of Amanda’s Race Chair
< Running Chair vs. Wheelchair | Pushing Etiquette >